When I started my Blogging career, I started with BlogSpot, and it’s always a wise idea to start with zero investment when you are a complete newbie. After getting used to the basics of Blogging, your next destination should migrate from Blogger to WordPress.
Over time, when you get more accustomed with blogging, you will likely realize that BlogSpot is not an ideal option for your blogging future for many reasons:
- You have less control over SEO of your blog.
- You can lose your blog anytime as Google holds the right to delete or ban any BlogSpot blog for a violation of their rules.
- BlogSpot is not accepted by many advertisement networks.
Here are steps you need to move from blogger to WordPress:
- Signup for Webhosting and domain name
- Export your BlogSpot blog
- Import BlogSpot blog to WordPress
- Setup Permalink on new WordPress Blog
- 301 redirect from Blogger to WordPress
- Import missed images from Blogger to WordPress
- final setup after migrating from BlogSpot to WordPress
How To Migrate From Blogger to WordPress: Step by step process
Before you migrate from BlogSpot to WordPress, you need two things: Domain name and hosting.
I suggest
Bluehost hosting as it offers unlimited hosting with one free domain name. Moreover, it’s officially recommended by WordPress team.
1. Get Hosting:
The first thing, you need now is to get the hosting and install WordPress so that you can import your content from Blogger to WordPress. I recommend Bluehost as it helps you get started quickly and offers a great hosting solution.
Moreover, Bluehost offers one free domain and right now they are running a discount for waytoidea readers and you will get hosting for cheap.
- Head over to Bluehost.com (Free domain + 60% Discount for limited time)
- Click on Get started and on the next page select basic package if you plan to host one site or plus package if you plan to build multiple sites in future.
If you already using a custom domain name, then use that (You can claim free domain later in the future). Using the custom domain name will make your life easier to do an SEO friendly migration from blogger to WordPress.
See my below notes for the domain name, in case if you planning to get a new one.
Domain name:
Domain name can be .com, .info, .org, .net but I will suggest go for .com or .org domain address.
If you buying hosting from companies like Bluehost , then you are getting the domain for free. If not, you can buy domain separately from any of this web-hosting as well.
There are few things needed to be taken care of while moving from BlogSpot to WordPress
- Traffic: You don’t want to give lots of 404 error pages to your visitors.
- 301 perma-redirection: The migration should be 301 perma-redirection or have canonical tag, else you will lose your existing search engine ranking.
- Permalinks: BlogSpot permalink and WordPress permalinks are not the same, and it’s important that you fix permalink after importing everything to WordPress.
- Some important things to keep in mind while migrating:
- After migration, don’t delete your BlogSpot blog.
- 301 permanent redirection means telling the search engine that your blog is moved to a new website, and all your traffic will automatically redirect to new domain address.
- Migrating visitors from BlogSpot to WordPress
- Migrating BlogSpot posts to WordPress
- Migrating BlogSpot Comments to WordPress
- Redirecting users to the post, rather than just homepage of new domain
- Migrate Feedburner feeds
- Migrate BlogSpot Images to WordPress
- import blogger to WordPress with images
2. Export your BlogSpot blog (Just for precaution)
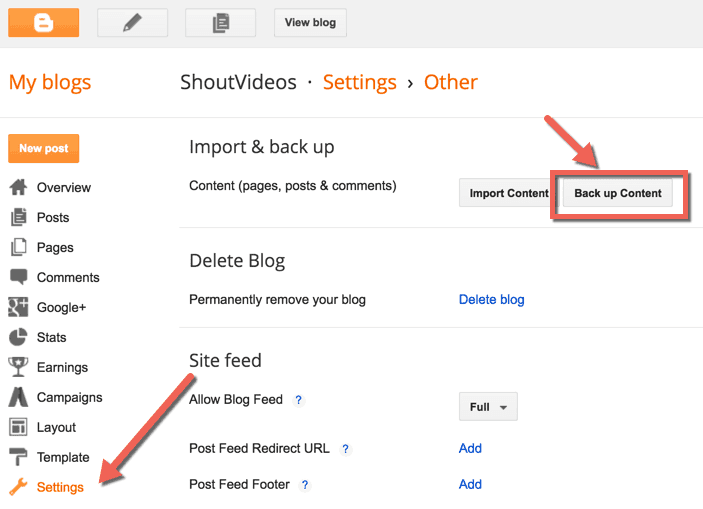
The method that we are using is straightforward with little manual works. But it works great. The very first step you need to do is exporting your BlogSpot blog. To do this, log into your BlogSpot dashboard, Click on Settings > Other & click on backup content.
Click on download blog & it would save your blog in the .xml format. With this, you have taken a complete backup of your BlogSpot blog & now you need to move your blog to WordPress.
Let the game start: Migrating BlogSpot blog to WordPress
If you haven’t installed WordPress, follow this guide & install WordPress on your Bluehost account. Do remember, your domain is not yet pointing to Bluehost, but we can still do everything without changing the nameserver.
This is little technical but very easy with this guide. All you need to do is edit your hosts file to point the domain to your Bluehost hosting I.P. If you are on Mac, you can use
free Gas mask app to quickly edit hosts file. If you are on Windows, you can search for guide on editing hosts file in Windows.
Once you have edited the hosts file, you would be able to access your WordPress blog on Bluehost. Do remember, this is only you who can see WordPress blog, for now, for everybody else, they will be accessing BlogSpot blog only. (We will do the switch once we done the migration). This way, your blog will not be down even for a minute.
Few things to do inside your WordPress dashboard:
- Go to plugins & disable all plugins
- Go to posts> You will see Hello World post> Delete that
- Go to Pages> You will see sample Page> Delete that
Once this is done, let’s start migrating all content from BlogSpot to WordPress. Do remember, in this scenario our target is not to lose existing ranking & traffic. So, grab the cup of coffee & follow the steps & within no time, everything will be done.
3. Using the Blogger importer Extended Plugin:
This is a great plugin that migrated all your posts, pages, images, comments & also maintain the formatting of your blog. There are few bugs that I will tell you later, but those are fixable in most of the scenarios. You can search Blogger importer Extended from the dashboard, or
you can download directly from here. Once installed & activated the domain, go to plugin settings that will bring a screen like this:
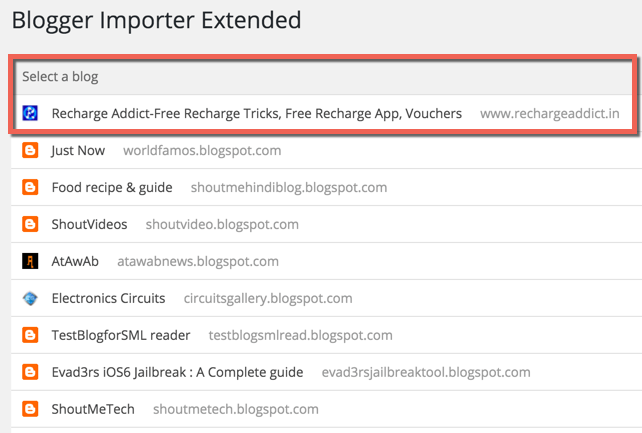
Click on Ok, let’s go & this will ask for access to your BlogSpot account. Click on Allow & on the next page it will list all the BlogSpot blogs you have in your account.
This will bring up screen like this, and you need to click on Start Import
Do notice the checkbox in the above screenshot. Keep it checked as it will preserve the formatting & slugs.
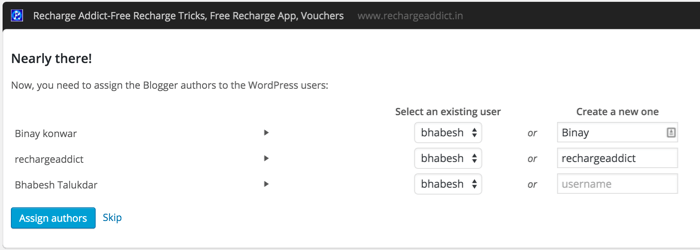
The easy part is done as your content is moved from BlogSpot to WordPress. Now the first thing you would be doing is to link the content to the users. If it’s single authored WordPress blog, you don’t need to do much. But if you have multiple writers, you need to create an id for them which is pretty easy. Refer to the below image:
4. Change WordPress permalink to match BlogSpot permalink
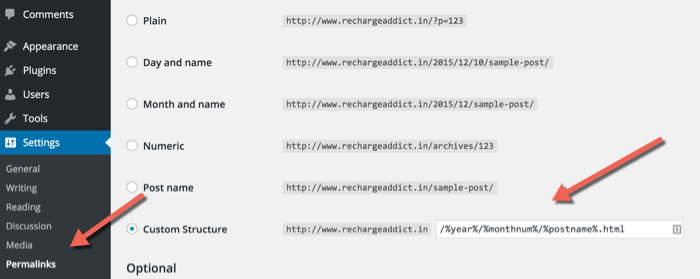
On your WordPress dashboard settings> permalinks, change your permalinks to match with BlogSpot permalinks
/%year%/%monthnum%/%postname%.html
If you have followed each step carefully, you have successfully migrated from Blogspot to WordPress with 301 permanent redirections. There are few more steps that are required to complete the BlogSpot to WordPress migration.
- Install & activate Smart 404 plugin
- Remove the Cname record & A record from your domain DNS
- Change the Nameserver of domain to point to your hosting
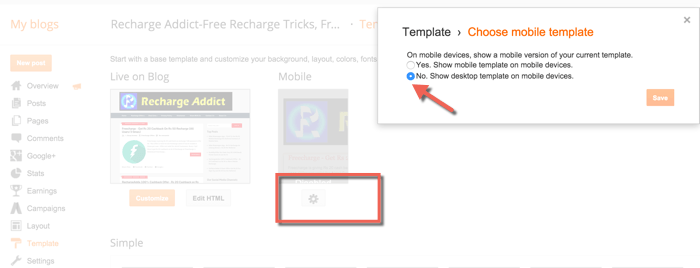
- Disable mobile template from your BlogSpot dashboard
5. Fixing BlogSpot mobile redirect in WordPress:
This is one important thing that will cause an issue on many browsers & popular browser like Opera, UCWeb will show redirect loop error. This is happening due to BlogSpot mobile redirect. To fix this, you need to edit your WordPress .
htaccess file & replace default code with the one given below.
# BEGIN WordPress
RewriteEngine On
RewriteBase /
RewriteEngine On
RewriteCond %{QUERY_STRING} ^m=1$
RewriteRule ^(.*)$ /$1? [R=301,L]
RewriteRule ^index.php$ - [L]
RewriteCond %{REQUEST_FILENAME} !-f
RewriteCond %{REQUEST_FILENAME} !-d
RewriteRule . /index.php [L]
# END WordPress
# Begin Redirection
#Redirect archives
RewriteRule ^([0-9]{4})_([0-9]{1,2})_([0-9]{1,2})_archive.html$ $1/$2/ [L,R=301]
#Redirect labels/categories
RewriteRule ^search/label/(.*)$ category/$1/ [L,R=301]
RewriteEngine On
RewriteCond %{QUERY_STRING} ^m=1$
RewriteRule ^(.*)$ /$1? [R=301,L]
#ATOM Feeds
RewriteRule atom.xml feed/atom/ [L,R=301]
RewriteRule feeds/posts/default feed/atom/ [L,R=301]
#RSS FEEDS
RewriteRule feeds/posts/default?alt=rss feed/ [L,R=301]
RewriteRule rss.xml feed/ [L,R=301]
#Comments Feed
RewriteRule /feeds/comments/default comments/feed/ [L,R=301]
RewriteRule /feeds/comments/default?alt=rss comments/feed/ [L,R=301]
# End Redirection
6. Import missed images from Blogger to WordPress:
There are times when few images are not moved to WordPress or at times, you might have hosted images on other server and since now you have your own, you should import all such images on your server. For this, we will be using this plugin called
cache images. Even though this plugin has not been updated for a while, but you should be able to use it without any issue.
Simply Install the plugin like any other plugin
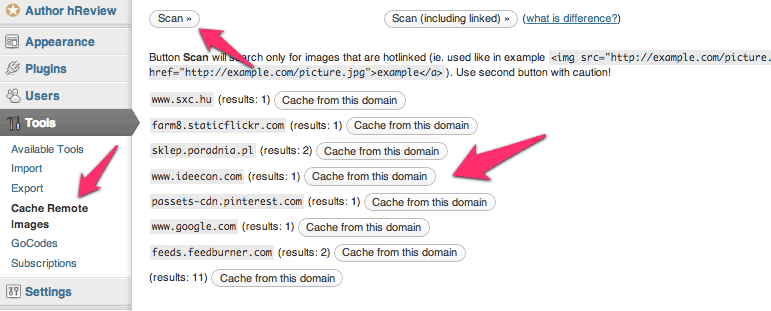
go to Tools > cache remote images and select option which says “Scan”. It will scan your posts and will show the list of domains from where images are hotlinked. (See screenshot)
For BlogSpot domains, you will see domains like 1.blogspot, 1.picasa and so on. Simply click on Cache from this domain, and cache plugin will start importing images from the hot-linked domain.
Personally, I use this plugin once every month as some time guest author here accidentally hot-linked images, and this plugin helps to find all those domains from where images are hot-linked, and host it back on waytoidea Server. Another good thing about Cache images plugin is, it uses AJAX to import images, so it will work on the underpowered server too.
Once this is done, your blog is successfully migrated to WordPress. After this, ensure that you do the SEO optimization of WordPress else you might lose out the traffic. Submit your sitemap, configure your robots.txt file & so on.
If you have any problem migrating from BlogSpot to WP, or other questions feel free to ask questions.


